Fish's Cozy MKIV
  • Welcome
  • Preparation, Visits, Tips
    • Preparation
    • Visits
    • Tips and Tricks
    • Special Cases - Interesting Fixes
  • Chapters 3-15
    • Ch 3 Practice
    • Ch 4-7 Fuselage, Main Gear
    • Ch 8 Head Rest, Heat Duct, Seat Belts
    • Ch 9 Main Landing Gear
    • Ch 10-12 Canard & Elevators
    • Ch 13 Nose >
      • Ch 13.1 Nose gear, Brakes, Landing Light and Skid Plate
      • Ch 13.2 Nose Top & Canard Cover
      • Ch 13.3 Relevant Later Work
    • Ch 14 Spar
    • Ch 15 Firewall
  • Chapters 16-25
    • Ch 16 Controls
    • Ch 17 Trim
    • Ch 18 Turtleback/Canopy >
      • Ch 18.1 Turtleback
      • Ch 18.2 Canopy
      • Ch 18.3: Latch, IP Cover, Misc
      • Ch 18.4 Lift and Locking Canopy (Version 1)
      • Ch 18.5 Electric Lift Canopy (Version 2)
      • Ch 18.6 NACA's for Engine Cooling
    • Ch 19 Wings
    • Ch 20: Winglets/Rudders >
      • Ch 20.1 Winglet Fabrication
      • Ch 20.2 Winglet Attachment
      • Ch 20.3: Rudder Fabrication
    • Ch 21 Strakes >
      • Ch 21.1 Strakes: Through "Top Hats"
      • Ch 21.2 Strakes: Bottom Skin through Prep for Top Skin Final Bonding
      • Ch 21.3 Strakes: Top Skin Final Bond through Fuel Tank Seal
      • Ch 21.4 Strakes: Misc Completion of Strakes
      • Ch 21.5: Strakes: Wing/Strake Fit Check
      • Ch 21.6: Strakes: Post Cure Tanks
    • Ch 22: Electrical >
      • Ch 22.1: Electrical: Inst Panel
      • Ch 22.2: Electrical: Firewall
      • Ch 22.3: Electrical: Warning Lights
      • Ch 22.4: Phase I Testing
    • Ch 23 Engine and Cowling >
      • Ch 23.1 Firewall and Mount
      • Ch 23.2: UL 520is Initial Integration
      • Ch 23.3 Cowling
      • Ch 23.4 UL 520is First Start
    • Ch 24: Seats, Armrests, Fairings >
      • Ch 24.1: Fairings
    • Ch 25: Finishing >
      • Ch 25.1 Canard
      • Ch 25.2 Interior
      • Ch 25.3 Fuselage/Strakes Bottom
      • Ch 25.4 Fuselage/Strakes/Canopy Top
      • Ch 25.5 Wings
      • Ch 25.6 Assembly in Primer and W&B 1
  • Ch 26: Hangar
    • Ch 26.1 Assembly and Fitting
    • Ch 26.2 More Punch List Stuff
    • Ch 26.3 Inspections
  • Ch 27: Ground Tests, First Flight and Ph I Testing
    • Ch 27.1: More Ph I Testing Stuff
  • Ch 28: Post Phase I Improvements
  • Ch 28.1: More Improvements
  • Ch 29: IFR

Ch 18.5   Canopy Lift (Version 2 - Electric)


Shifting to Electric Canopy Lift:
​   With the loss of hydraulic reliability in the Bansbach passive lift, and discussion with Andrew Anunson, I decided to pursue an electric actuator lift.  I wanted to use the already installed pins to minimize re-work, so I purchased a PA-03 actuator at the 10", 200lb range to give me rapid response with a little overkill on the loading as a safety measure for holding the canopy down in the near closed position if it lost partial latching, and had to get used to the larger size of having the electric motor just behind the co-pilot seat back.  I still would have preferred the passive locking system, but...  I also purchased the PA-33 controller which would allow me to use a key fob to actuate the canopy up and down from outside or inside the Cozy.  New builders: If I were building this from scratch I would have positioned the lower pin a little higher and used the 8" stroke actuator.
     Warning, this controller uses 50 mA of current in standby mode, so power needs to be turned off to it when you leave the plane for 24 hrs or more to prevent draining the battery.  I installed a power switch for the controller in the pilot strake that's accessed via a lockable pivoting motorcycle gas tank cap.  I later decided to re-wire the actuator without the controller but using two spring loaded (up)/off/(down) switches:  1 in the strake by the lockable door and one further forward in the strake that can be easily reached from inside. (Still working on the wiring for this new configuration). 
Picture
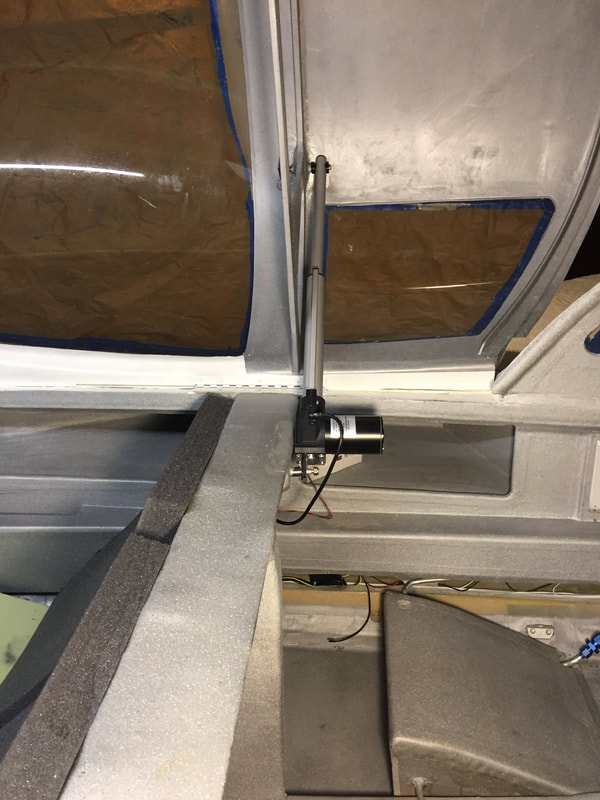
Here's a look at the PA-03 actuator in the same pins I set for the locking gas strut, with the canopy open. I later made a 0.8" long Aluminum adapter piece for the lower pin location to have the actuator stop within the latches in the "down" position.

Proudly powered by Weebly