Chapter 29: IFR
I'm using this "Chapter" to describe work associated with making N78CZ IFR Legal. The IP I built the plane with is extremely capable in VFR with 2 completely independent WAAS GPS based Navigation systems, both of which have their own battery backup (independent of the aircraft electrical system). Despite the WAAS GPS performance however, they are not IFR certified with RAIM and I had no NAV radio for VOR/ILS backup to the GPS system. As I begin to fly more and farther, I found myself increasingly constrained by weather. This provided the impetus to get both myself and the plane IFR rated. This section deals with that migration. I'm pretty fortunate that Mike Satchell in Ft Worth has the same equipment as I'm going to use (his panel is even more sophisticated with Dual HDX displays, SV COM, SV manual input knobs, and SV Autopilot sub-panels). He was great help comparing notes on wiring and setup of these extremely capable systems. As I'm working this, he's close to build completion with what will surely be a terrific VFR/IFR Cozy, right out of the build stage.
|
Flight Management System and Navigator:
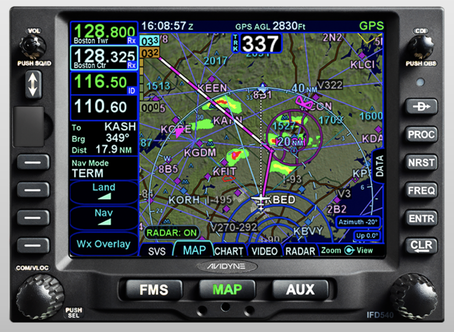
I debated whether to go the easy route and install the bare minimum IFR GPS Navigator and was very close to doing so. As I explained on the Cozy User's Group however, I decided to install a full COM/NAV/GPS navigator since I wanted to do my flight training in my own airplane and get really good with what ever system I installed. Unlike some pilots, my likely path forward is not flying a lot of different airplanes, but rather flying mostly THIS plane to a lot of different locations. This gave me a fully capable flight training and testing platform, and provided backup to the RNAV type approaches with ILS/VOR capability when I absolutely need them (hopefully not often). Yes, it did cost more to get a fully function al Flight Management System (I picked the IFD540 from Avidyne) but I think this cost is manageable and reasonable for me, and was not inconsistent with value of this airplane already. |
|
Audio Panel:
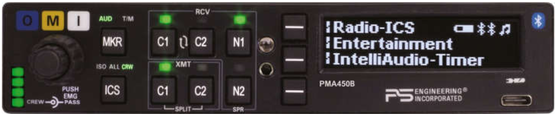
With the addition of a 2nd COM and a NAV radio, I now needed an Audio Panel that could manage selection of which was being used. This also provided an opportunity to migrate from the 2 seat intercom I've had so far (and was all I needed) to a 4 seat intercom for the rare occasions in the future where I have a person in one or both back seats. I chose the PS Engineering PMA450B audio panel because it appeared from my research to be a highly capable audio system with all the modern audio signal processing for differentiation of intercom and 2 other audio channels with stereo headsets. It also had the latest in bluetooth capability for when my passengers DONT want to listen to ATC or other airplanes and can be isolated with their music.
With the addition of a 2nd COM and a NAV radio, I now needed an Audio Panel that could manage selection of which was being used. This also provided an opportunity to migrate from the 2 seat intercom I've had so far (and was all I needed) to a 4 seat intercom for the rare occasions in the future where I have a person in one or both back seats. I chose the PS Engineering PMA450B audio panel because it appeared from my research to be a highly capable audio system with all the modern audio signal processing for differentiation of intercom and 2 other audio channels with stereo headsets. It also had the latest in bluetooth capability for when my passengers DONT want to listen to ATC or other airplanes and can be isolated with their music.
Mechanical Installation in the IP:
I'm mounted this stack in the center section of the IP under my existing GTR200, which is very typical for this equipment. I'd left plenty of room in this area for growth during the build, and with the IFD540/PMA450 I completely consumed it! A lot of careful measurements were made to insure fit, and the dimension I needed to pay closest attention to was depth. The IFD needs 11.5" of depth with the connectors and it was close to interfering with the wires exiting the grounding block I mounted long ago. I followed the directions and made the required cutouts in the panel, then built custom 3BID fiberglass flanges on either side to bolt the front "shelf" flanges to, for each component. I supported the rear of the IFD shelf with an aluminum hangar strap from the aluminum support bar I already had installed between the IP and F-28. Because the PMA is light, it's shelf rests on top of the substantial frame of the IFD shelf.
I'm mounted this stack in the center section of the IP under my existing GTR200, which is very typical for this equipment. I'd left plenty of room in this area for growth during the build, and with the IFD540/PMA450 I completely consumed it! A lot of careful measurements were made to insure fit, and the dimension I needed to pay closest attention to was depth. The IFD needs 11.5" of depth with the connectors and it was close to interfering with the wires exiting the grounding block I mounted long ago. I followed the directions and made the required cutouts in the panel, then built custom 3BID fiberglass flanges on either side to bolt the front "shelf" flanges to, for each component. I supported the rear of the IFD shelf with an aluminum hangar strap from the aluminum support bar I already had installed between the IP and F-28. Because the PMA is light, it's shelf rests on top of the substantial frame of the IFD shelf.
|
Wiring/Hardware Interface Configuration:
I'll not go into the specifics of wiring, but one needs to thoroughly read and follow the diagrams from the IFD and Skyview Installation Manuals. The key on the wiring is to realize that the IFD is a plugin replacement for Garmin navigators, so the pin wiring from the IFD to the SV ARINC module is the same as if you were installing a Garmin. I built up the wiring that I needed, which was a substantial subset of what's covered in the IFD manual because the ARINC simplifies things, AND I'm not using a separate autopilot (it's in Skyview network), ADSB, Radar, and a bunch of other stuff I don't have. From this, I made a harness after measuring where the various connectors would be, relative to each other. The result worked great, and most of the complicated wiring was the migration of all the audio (headsets/mics/output etc) from the GTR to the PMA Audio panel, while making the GTR another input to the audio panel as well. Rather than pull the dSub pins (I found the female pins of the GTR impossible to extract, and they were going to be changed to male dSubs for the PMA) I just cut the audio wires at the GTR dSub connector and re-crimped new pins and made new connectors for the Audio Panel. Getting the setup configurations was not straightforward from reading the installation manuals because they didn't cover linking IFD with Skyview. With some help from other Cozy folks who had similar configurations and getting a live field support person from Avidyne, it was pretty easy and worked quite quickly. To the right are the 4 key views of setup screens that are needed. |
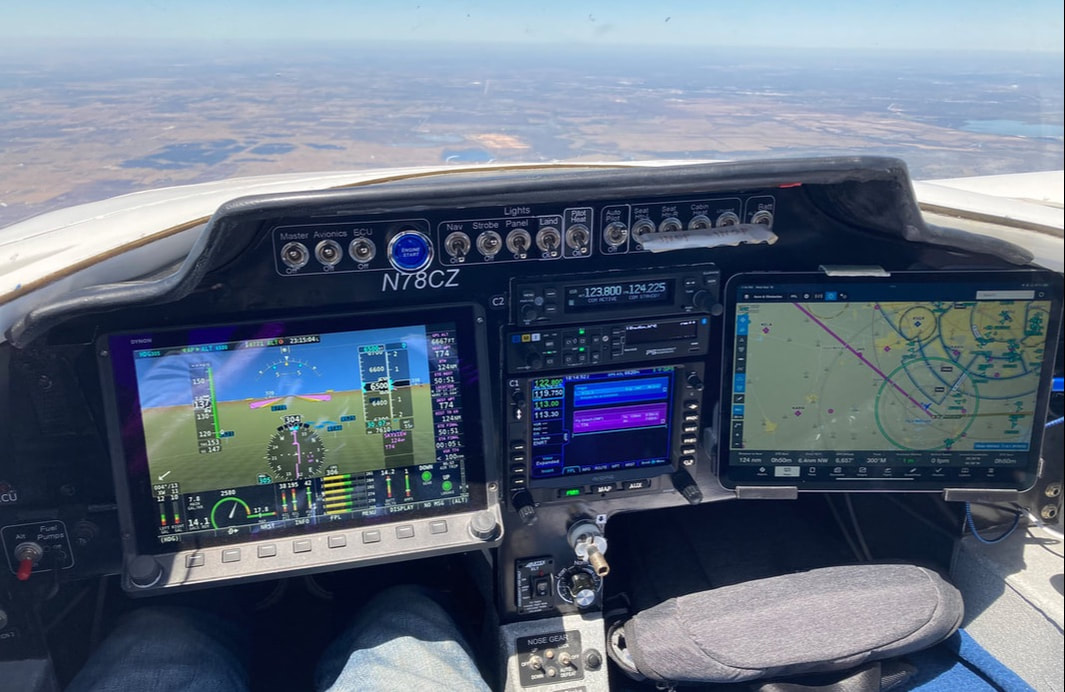
Updated view of my IP. There's a lot of glass here! Frankly, I'm glad I didn't have all this to look at during the first year of flight. Over time, I'll determine a better display content allocation that works well for me. These glass systems can back each other up on Map views, so I currently give the Dynon: Full Width PFD when I can. I don't have separate knobs for AP and Bugs so I've had to be clever about allocation on the HDX knobs. time will merge this into a rational flow.
|
Getting All This Glass to Talk Nicely With Each Other:
As I started to learn IFR from instructors, it became apparent that there was a whole new level of utility in these avionics that I was not fully tapping when flying simple VFR, even cross country. There are relatively simple and easy to use capabilities in Dynon Skyview, Foreflight, and Avidyne IFD for flight planning but before the IFD, it was a pain to upload/download a flight plan between Dynon and Foreflight because I had to switch the wifi on the iPad to talk to Dynon. This problem was solved with some digging and video watching and finally with communication with Avidyne and now they all work together. Here's how:
1. Because the IFD communicates realtime with the Dynon via the ARINC, flight plan sources for navigation (including use of the Autopilot) can be set in the Dynon to be from Dynon (VFR GPS based) or IFD (IFR GPS or VOR/ILS) any time active flight plans are built in either system. They don't displace each other, I just have to tell Skyview which source to use.
2. Foreflight flight plans are shared with the IFD over the Sentry wifi, which is great because now I don't have to switch wifi on either the IFD or the iPad/Foreflight. That means that I retain the ADSB/Weather from Sentry in Foreflight ALL THE TIME. I can push and pull flight plans from the Foreflight side to the IFD/Flight Plans list at any time using the "Panel" exchange icon.
3. I can do my IFR prep at home with Foreflight, then push the flight plan to IFD at the plane, and add/change any specific procedures there or in flight. Any changes can be pulled back to Foreflight (if needed) without disabling ADSB temporarily.
The trick to getting this to work is setting up (Maintenance Mode) the IFD with the addition of the Sentry wifi and password and setting this to "remote" mode. Then configuring the IFD in flight mode to use the Sentry wifi. That's it: Foreflight in Sentry wifi will now push/pull flight plans through the Panel icon. Note that you still need to select the flight plan pushed from Foreflight in the IFD's Flight Plans list and activate it to see it on the FMS page and have it accessible to Skyview when IFD is the selected source.
As I started to learn IFR from instructors, it became apparent that there was a whole new level of utility in these avionics that I was not fully tapping when flying simple VFR, even cross country. There are relatively simple and easy to use capabilities in Dynon Skyview, Foreflight, and Avidyne IFD for flight planning but before the IFD, it was a pain to upload/download a flight plan between Dynon and Foreflight because I had to switch the wifi on the iPad to talk to Dynon. This problem was solved with some digging and video watching and finally with communication with Avidyne and now they all work together. Here's how:
1. Because the IFD communicates realtime with the Dynon via the ARINC, flight plan sources for navigation (including use of the Autopilot) can be set in the Dynon to be from Dynon (VFR GPS based) or IFD (IFR GPS or VOR/ILS) any time active flight plans are built in either system. They don't displace each other, I just have to tell Skyview which source to use.
2. Foreflight flight plans are shared with the IFD over the Sentry wifi, which is great because now I don't have to switch wifi on either the IFD or the iPad/Foreflight. That means that I retain the ADSB/Weather from Sentry in Foreflight ALL THE TIME. I can push and pull flight plans from the Foreflight side to the IFD/Flight Plans list at any time using the "Panel" exchange icon.
3. I can do my IFR prep at home with Foreflight, then push the flight plan to IFD at the plane, and add/change any specific procedures there or in flight. Any changes can be pulled back to Foreflight (if needed) without disabling ADSB temporarily.
The trick to getting this to work is setting up (Maintenance Mode) the IFD with the addition of the Sentry wifi and password and setting this to "remote" mode. Then configuring the IFD in flight mode to use the Sentry wifi. That's it: Foreflight in Sentry wifi will now push/pull flight plans through the Panel icon. Note that you still need to select the flight plan pushed from Foreflight in the IFD's Flight Plans list and activate it to see it on the FMS page and have it accessible to Skyview when IFD is the selected source.